FrAid Graphics Panel (manipulating and capturing graphics)
FrAid Graphics Panel
Introduction
This is the main tool to plot graphics in FrAid. It is a panel which could be opened as a separate window or embeded in your Applet or Application GUI.
FrAid Graphics
Each type of FrAid graphic recuires the appropriate plugin. Technically speaking a plugin is a jar file which you either install separately (copy to the bin directory) or is a part of your initial distribution. It consists of:
- FrAid library function. This is the entry point for invoking this type of plotting algorithm.
- The saved on disk settings file. This file controls the appearance and behavior of this type of plot. It may be saved externally in the fraid_settings directory or it may be inside the jar. If it is missing in fraid_settings FrAid will try to find it inside the jar if it is not there FrAid will assume the default settings for this plugin. The settings files are transparent for most FrAid functions and only the functions whose names start with '_' require a plugin name explicitly specified (see _plot, _transform3, etc.)
- The algorithm itself, the direct result of which you can see in the FrAid GraphicsPanel or in the images you save on disk.
Functionality of the Panel
In all different contexts where it could be used the GraphicsPanel should provide you with the same appearance and behaviour (changed only by the current plugin it is being used with).
Controls

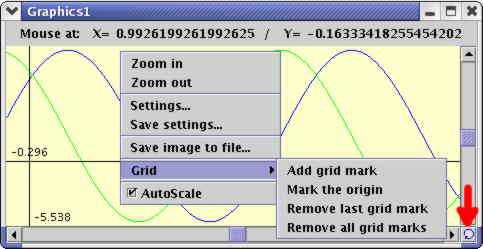
- Horizontal and vertical sliders for scrolling - note that the sliders a centered so there are no limits of the scrolling; after you adjust the desired scroll level, the coordinates will be readjusted and the view of the plotted object will be regenerated at these cordinates.
- History/Stop Button (pointed at the picture) - after every plot the previous state (window size and coordinates of the corners) is saved so you can trace back your resize and scroll actions; while the algorithm is still working (the button icon changes to a Stop sign) you can use the same button to stop the algorithm and return to your last image (especially useful when using slow algorithms i.e. julia, Note: may not work with all algorithms).
- Inormation labels (at the top of the panel): Programmable, currently show the position of the mouse in plane coordinates (may need to stretch the window to make both visible);
-
Mouse keys action:
- Left - depends on the plugin;
- Center - mark zoom regions (see Zooming);
- Right - popup menu;
-
Popup Menu (the items here may varry depending on the particular plugin but these are the common ones):
- Zoom in - if zoom region is specified (with the middle button) zooms into the region, if not zooms at the middle of the screen (300%);
- Zoom out - if zoom region is specified (with the middle button) zooms out the region, if not zooms out centered around the current image;
- Settings - opens the SettingsEditor loaded with the current plugin object, the changes take place immediately it is closed and the image is regenerated (this is the way to change colors or nay of the other settings);
- Save settings - saves the current settings (plugin) to file (which for instance could be used later with the _plot function);
- Save image to file;
- Grid - manages the grid marks; (Java) Works only with BufferedImages (won't work with julia, for instance);
- Add grid mark - adds a vertical and a horizontal grid lines (specify the color through the gridColor setting) through the point where you clicked the mouse and marks the coordinates (specify how many digits to be used using the numberGridMarkerDigitsX and numberGridMarkerDigitsY settings);
- Mark the origin - adds grid mark through (0, 0);
- Remove last grid mark - removes the last added;
- Remove all grid marks - clears all;
- Auto scale - depends on the algorithm used, see the particular graphics function;
Zooming
You can zoom in and out using:
- The popup menu (see the Controls section above)
- The middle mouse button:
- To zoom in:
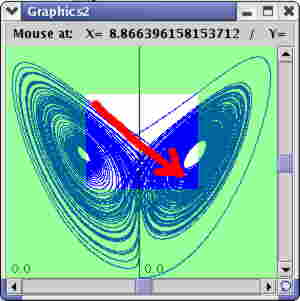
- press (and hold) the middle button at the upper left corner of the region you want to mark (this will be the upper left corner of the your zoomed image);
- drag (move while holding the button pressed) in a down and right direction (see picture) and see your region being marked (your region remains clear while
the rest of the picture is tinted green):

- release the middle button at the desired position (this will be the bottom right corner of the your zoomed image);
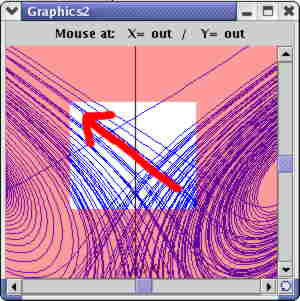
- to Zoom out - similar to zoom in but the direction you mark is left and up (see picture) and the zoomed out picture will be positioned and scaled
according to the ratios between size and position of the region marked and the current window (your current panel will be positioned and
scaled as if it is your marked region), so the smaller the marked region the larger the zoom (exactly opposite to zoom in) will be:

NoteZooming will not change the aspect ratio. To change the aspect ratio specify your frame size and upper left / bottom right corners when calling the graphics functions (most of them take additional parameters for size and span) or use the popup menu to open the settings editor. - To zoom in:
Saving the current image to file
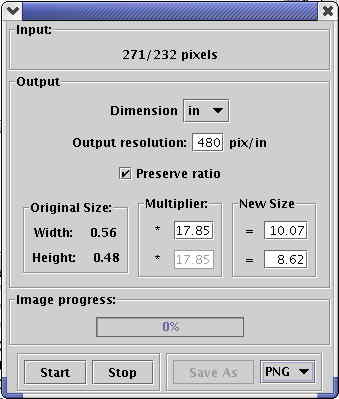
Click Save image to file from the popup menu of the GraphicsPanel which image you want to save. The save dialog will appear:

Input fields:
- Input: the original image size;
-
Output:
- Dimension - choose this first - pix/in/cm;
- Output resolution - if in or cm chosen as dimension specify resolution;
- Preserve ratio - if checked will keep the aspect ratio when changing dimensions;
- Original size - the size of the original image in the new chosen dimension;
- Multiplier - is image smaller or bigger thn the original;
- New Size - the size of the new image in the new chosen dimension;
- Image progress: progress indicator, not all algorithms use it to show continious progress, some will just move it to show that they work (needs to change);
- Buttons - saving the image is a two step process - first you generate it using the Start button and than you save it using the Save As button
(this way you can save the same image under different formats and/or resolutions)
- Start - starts generating he image to be saved using the specified parameters from the Output pane;
- Stop - stops the image thread, can call Start again;
- Save As - this button becomes enabled only when the image thread is done. Make sure the correct file format (the dropdown to the right) is selected;
- File format - will contain the current encoders installed at your system (Note: the PNG encoder is really slow, but the quality is great);


